My-domain.com/wp-admin is the default URL for accessing the administration area of WordPress projects, which is known to cyber criminals. As a result, they all too frequently utilize the WordPress “wp-admin” URL as a point of attack. You can change the name or conceal the default path to your WordPress admin login to safeguard yourself against this and other attack methods.
This post will demonstrate how to locate your website’s WordPress login URL so that you can quickly access the admin area. We’ll also go into greater detail on issues like how to secure, customize, and alter the default login URL.
We’ll be covering topics such as-
- Why You Need to Change the WP Login URL
- What is the WordPress Admin Page?
- How to Locate the URL for WordPress Login
- Exploring WordPress Subdomain Login URL
- URL for the WordPress login sub-directory
- How to Change WordPress Login URL Without Plugin
- How to Change the WordPress Admin Login URL With a Plugin
- How to Lock the WordPress Login Page
- How to Customize the WordPress Admin Login Page
- Common Login Problems on WordPress Websites and How to Fix Them
Table of Contents
Toggle- Why You Need to Change the WP Login URL
- What is the WordPress Admin Page?
- How to Locate the URL for WordPress Login
- Exploring WordPress Subdomain Login URL
- URL for the WordPress login sub-directory
- How to Change WordPress Login URL Without Plugin
- How to Change the WordPress Admin Login URL With a Plugin
- How to Lock the WordPress Login Page
- How to Customize the WordPress Admin Login Page
- Common Login Problems on WordPress Websites and How to Fix Them
Why You Need to Change the WP Login URL
WordPress is one of the most well-liked content management systems (CMS). Consequently, hackers also like it very much. Additionally, by including “wp-admin” or “wp-login.php” in the URL of your website, anyone can access your default login page. As a result, it makes your login URL the main method through which hackers launch their attacks.
Making a custom login URL is one of the simplest ways to protect your WordPress site from hackers. By doing this, you may protect your login page against unwanted behavior and restrict access to those you are comfortable giving. The two methods for changing your WordPress admin login URL—without and with a plugin—are described in this post.
What is the WordPress Admin Page?
The back end of your WordPress site is the WordPress admin page or WordPress admin area. You will arrive at it as soon as you check in. It appears as follows:
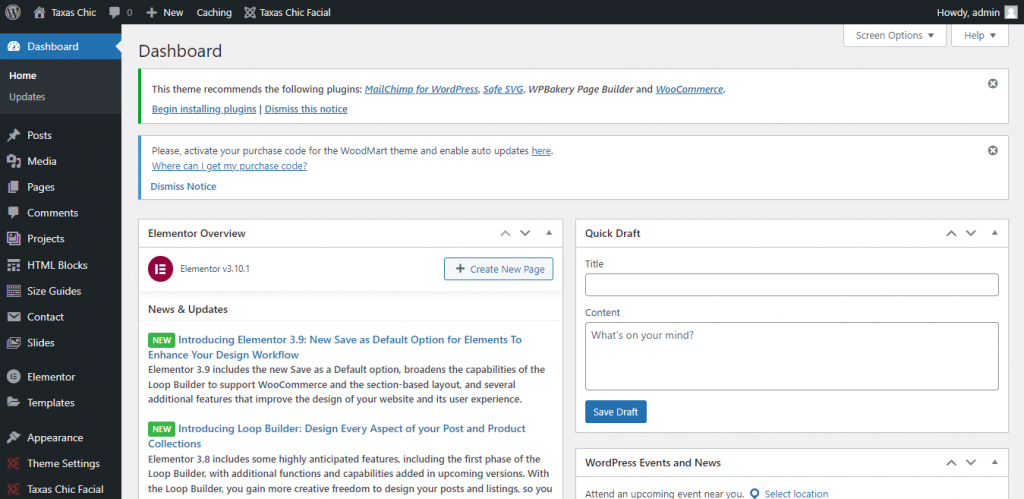
The admin panel, WordPress admin panel, WordPress dashboard, or WP admin dashboard are other names for the WordPress admin page. You can manage your website through the admin interface and carry out crucial tasks like:
- Install plugins and themes.
- Adding or updating your website’s pages.
- Post new blog entries.
- Comment moderation on your WordPress website.
- Utilize the Theme Customizer to make changes to your website.
The WordPress admin page is, in a nutshell, the most crucial part of your website.
How to Locate the URL for WordPress Login
You must be wondering how to access the WordPress admin page now that you are aware of what it is. You must visit the WordPress login page and input your login information in order to access the admin page of your WordPress website.
A WordPress login page appears as follows:
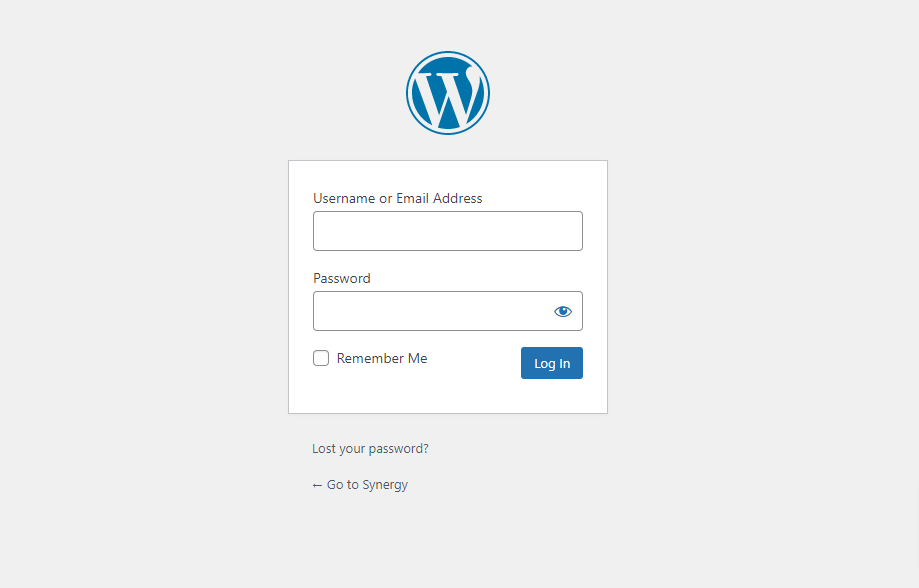
Now, there is no unique page where your website’s login page link is located. But there are other ways to access the login page. One of the most popular methods is to enter the name of your website (or domain name) into the address bar of your web browser, followed by a forward slash (/), and then the words wp-admin:
https://example.com/wp-admin
Simply change example.com to your domain name in the URL above and paste it into your browser’s address bar. The login page for your WordPress website will appear once you press enter on your keyboard. Your username and password can now be entered in the corresponding areas.
Since most hosting companies provide such information to your registered email address, you can check your email if you don’t have the login credentials. When setting up your website, you might have created the login information if your server offers an installer like Softaculous.
When you’re ready to access your WordPress admin page, click Log In.
You can access the login page using the following 3 other URLs:
- example.com/login
- example.com/admin
- example.com/wp-login.php
Again, all you need to do to get started is swap out example.com for your domain name.
Exploring WordPress Subdomain Login URL
You might occasionally need to set up WordPress on a subdomain. You might, for instance, run an e-commerce website and have WordPress set up on a subdomain like blog.example.com. In such circumstances, how can you get to your WordPress admin login page?
Here are the several methods you can use to access the login page when WordPress is set up on a subdomain:
- blog.example.com/wp-admin
- blog.example.com/login
- blog.example.com/admin
- blog.example.com/wp-login.php
To reach the WordPress login page, use any of the aforementioned URLs, replacing blog.example.com with your subdomain. Isn’t that easy?
URL for the WordPress login sub-directory
You can install WordPress on a subdirectory just like subdomains. The URL might be like example.com/blog. You can use any of the following URLs to access your sub-login directory’s page (change example.com/blog with the path of your sub-directory):
- example.com/blog/wp-admin
- example.com/blog/login
- example.com/blog/admin
- example.com/blog/wp-login.php
You’ll reach the login screen after doing this. To enter the WordPress admin section, use your login information. New WordPress users may find it challenging to remember their website’s login URL, whereas experienced WordPress users can remember it with ease.
Is there a simple way to get to the WordPress login page? Fortunately, there are three methods you can use to remember the login page so you won’t have to type it in your web browser’s address bar every time.
1. Bookmark the Login Page of Your WordPress Site
Making a bookmark of any website on your browser is the simplest way to keep it in mind. This will make it easier for you to immediately visit the login page whenever you need it. Depending on your web browser, there may be a difference in how to bookmark any given URL.
If you’re using Google Chrome, for instance, all you have to do is navigate to your website’s WordPress login page and click on the star icon located in the URL bar. When a modal window appears, you must choose the bookmark folder and press the Done button.
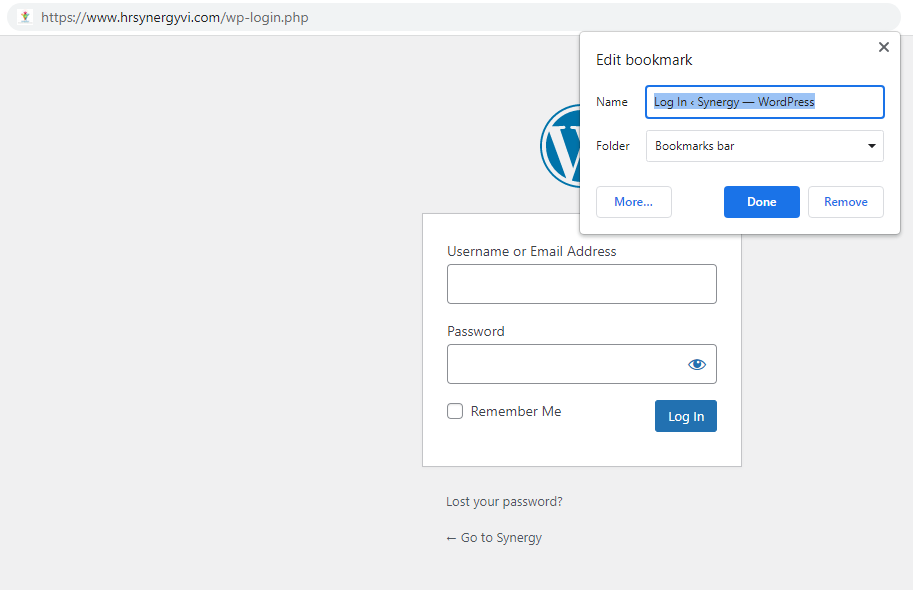
Your Google Chrome login page will be bookmarked as a result. You can use the keyboard shortcut CTRL + Shift + O (or Cmd + Shift + O) to activate the Chrome bookmark manager and then type the login page into the search box to open a bookmarked page.
2. Add the Login Page Link to Your Website
Including a link to the login page on your website is another approach to help users remember it. You can use this to access the login page from your home page. Now, you may add the login link to your website’s menu, sidebar, or footer. Please allow us to demonstrate.
- Menu
You must first visit your WordPress admin dashboard in order to add a link to your website’s menu.
Next, select Menus from the left sidebar by going to Appearance. You will then be directed to the Menu page. By clicking on the dropdown menu here, you must choose the menu to which you wish to add the link. Click Select when you’re finished.
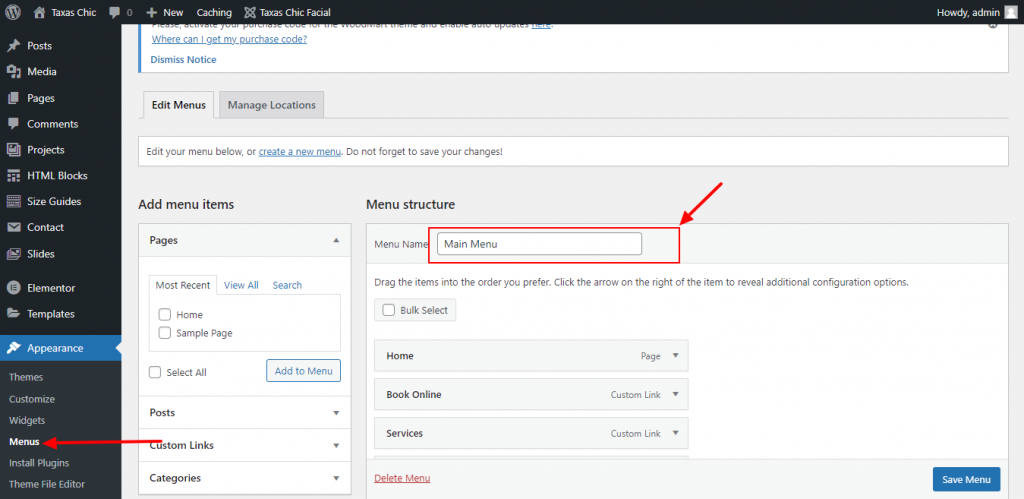
The login link can then be added by clicking the Custom Links tab, which is accessible from the Add menu items section. Here, you must include a link text and the website’s login URL (e.g., Login Page).
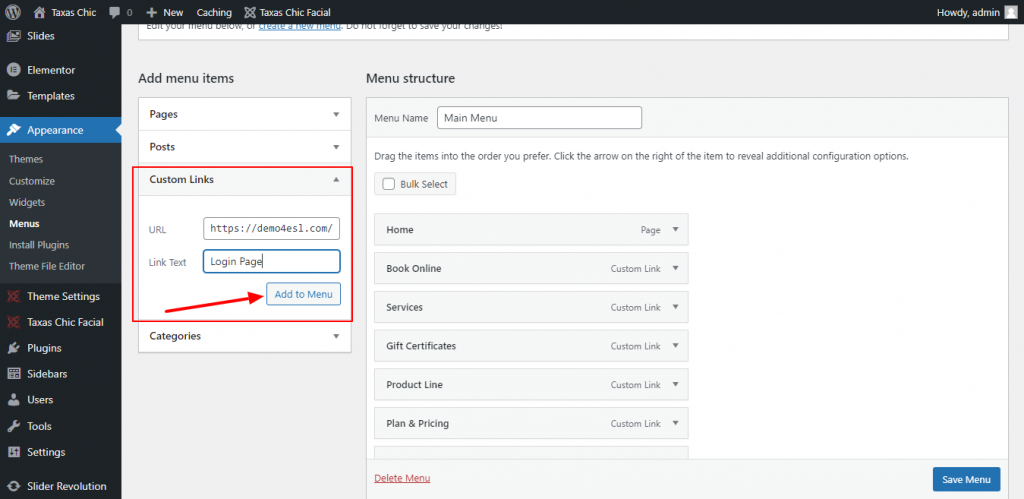
Once finished, you must press the Add to Menu button. The menu item’s position can then be adjusted by dragging and dropping it. Finally, in order to save the modifications, you should click Save Menu.
This will include the login link in your website’s menu. Simply open your website whenever you need to access the login page and click the login link in the menu to instantly open that page.
- Sidebar and Footer
The steps for adding a link to the footer or sidebar are the same.
You must first navigate to Appearance > Widgets on the left sidebar. You can add a widget to any of the sections listed on the Widgets page. The theme you’re using will determine how this works.
We have the following choices because we’re using the Astra theme:
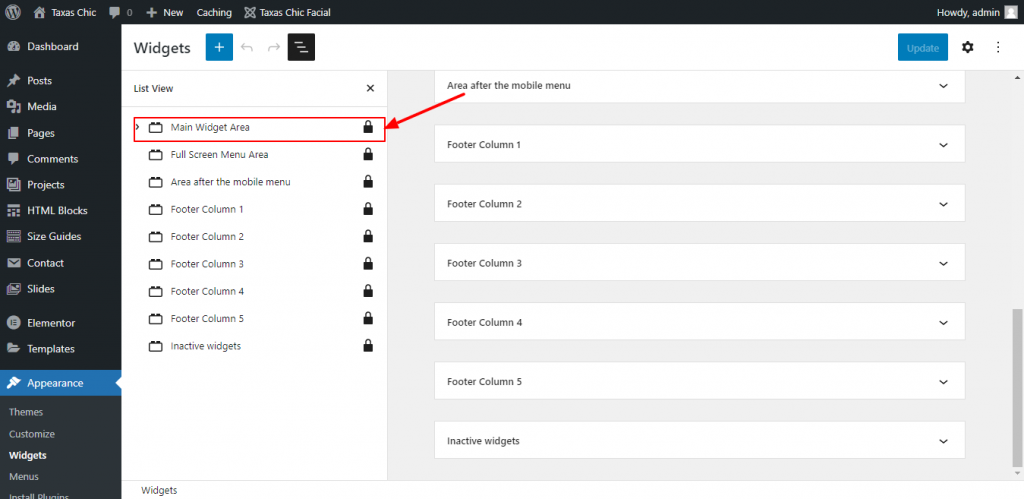
You must now select any widget area (footer or sidebar) and drag the Meta widget there from the Available Widgets section. This will include the log in link in your sidebar or footer along with other links.
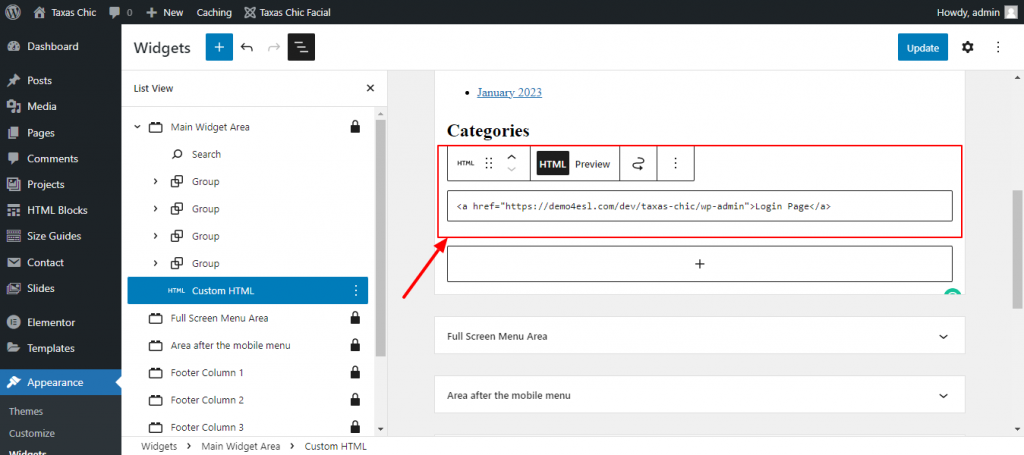
The Custom HTML widget should be added to the widget area of your choosing, and the following code should be added to the content area if you only want to display the login link:
<a href=\”https://example.com/wp-login.php\”>Login</a>
Click Save after changing your domain name’s example.com in the aforementioned code. You can omit any text from the Title area.
- Log in to WordPress Admin Page from Your Web Hosting Dashboard
Some web hosts, such as Bluehost, Cloudways, and SiteGround, allow you to access your WordPress website from their control panel.
You can use this option by simply logging into your web hosting account, where you will find a link to your website’s WordPress login URL on the dashboard. To access your website’s login page, click that link.
How to Change WordPress Login URL Without Plugin
The first technique entails altering WordPress core files to modify your login URL. Therefore, it’s a good idea to back up your current WordPress instance before moving forward. As an alternative, you can have your website hosting company back it up. In this tutorial, Bluehost will be used.
A file manager is provided by Bluehost, a reputable and prominent WordPress hosting company, making it simple to download, edit, and upload fundamental WordPress files. To follow this guide, you’ll also need to download a text editor. While there are many other text editors available, including Notepad++, Atom, and others, we choose Sublime Text.
It’s finally time to start once you’ve downloaded all the necessary tools.
1. Download Your wp-login.php File.
The code that creates the login page for your website is located in your wp-login.php file. To modify the login URL, you must alter that file. The first step is to locate the “public HTML” folder in your websit’s file management.
Open your website in Bluehost, choose the Settings tab, and then click the File Manager button to access that section.
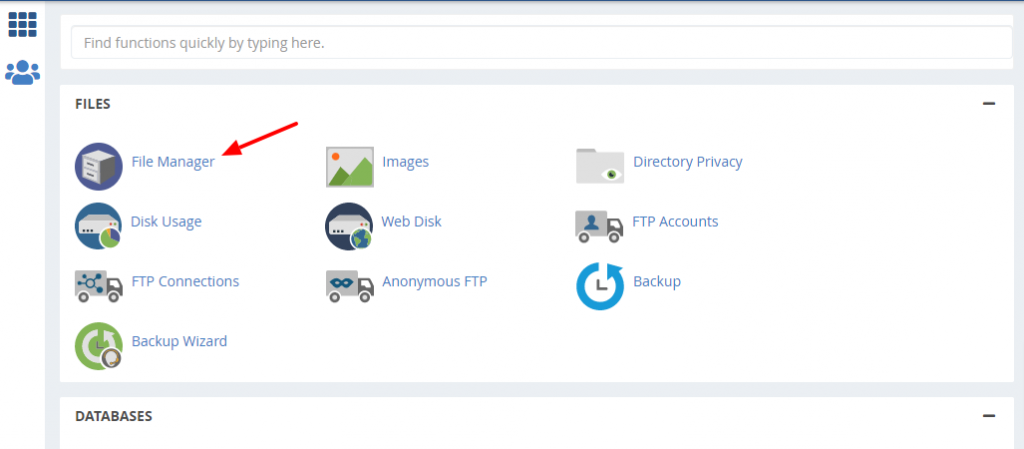
Next, select the public HTML folder by clicking it in the File Manager‘s left sidebar.
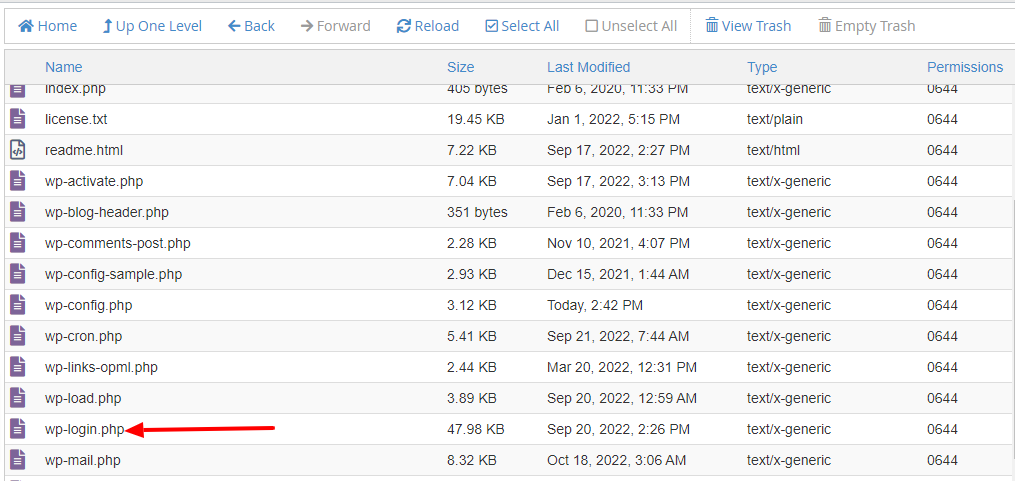
Then, locate and download the wp-login.php file to your PC.
2. Find and Replace the Old Login URL
Open the wp-login.php file you downloaded in your text editor to see the code. Once you’ve located every instance of “wp-login” in the file, replace it with a new login URL. For instance, our new URL is “wp-new-login,” but you should use a phrase that is specific to your website and is simple to remember.
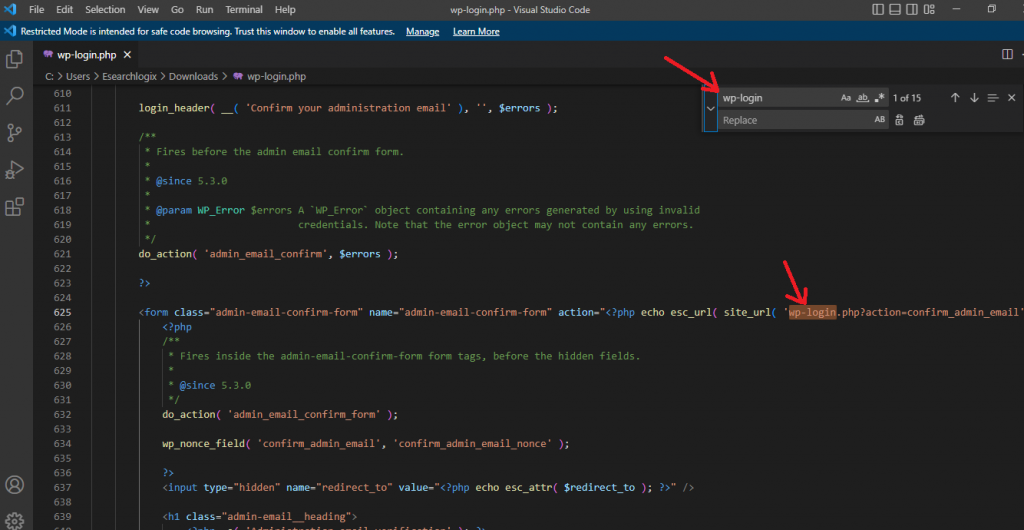
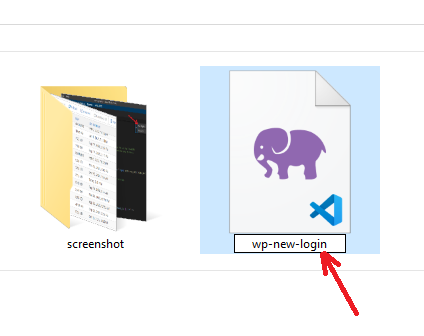
Save your file after you’ve made those modifications. Next, rename the file to the new URL you entered, in this example wp-new-login.
3. Upload Your New Login File
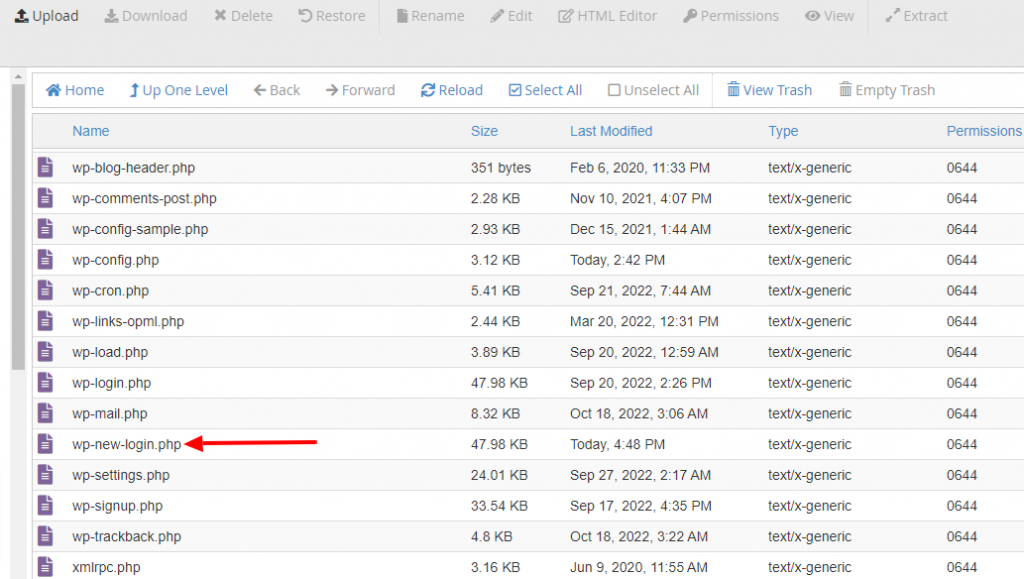
You’re prepared to upload your login file again to your WordPress website now that it has a new login URL. Return to your File Manager and upload a New File, selecting the customized login file you created in the previous step.
4. Register a New Login File URL using the Login URL Filter Hook
The next step after uploading your new login file is to use the “login URL” filter hook to register the URL of your new login file. This feature enables you to utilize any sort of page—as long as it has a login form—as your login page. For instance, you might make a coming soon page and use a login form to enable logged-in users.
Open your Theme Functions file and paste the following code there to accomplish this:
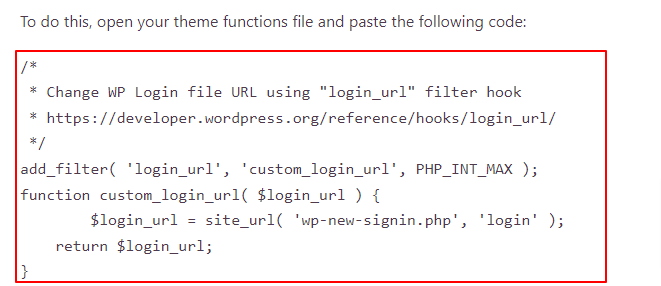
Save the file and move on to the next step.
5. Test Your New Login URL
You should test your new file before deleting the default login file from your WordPress website. To do this, enter your new login URL at the end of the URL for WordPress in the address bar of your browser.
For illustration, our complete login URL would be as follows:
Startupyourwpsite.com/agency/wp-new-login.php
And getting there displays our WordPress login form.
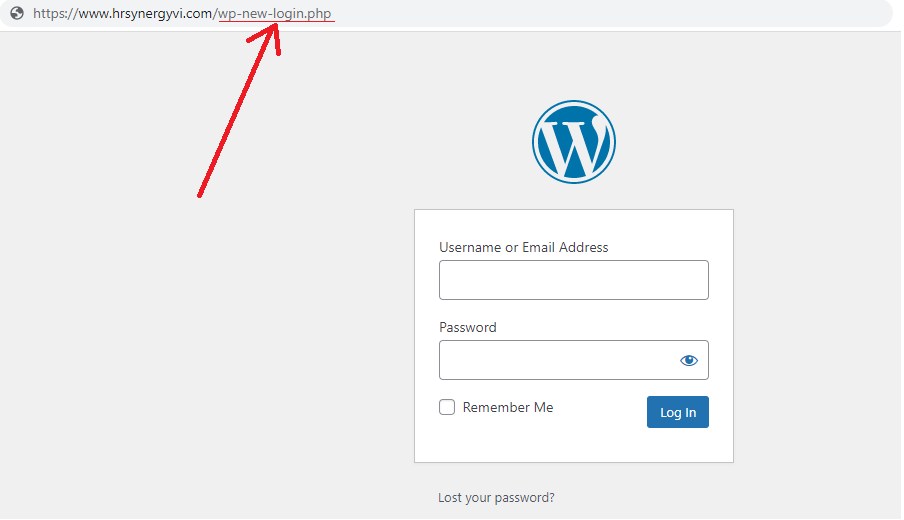
If the result is the same, your new WordPress admin login URL is functional, and you can go to the following step.
6. Delete the Original Login File
The wp-login.php file that already exists on your website should be removed as the last step in this procedure. When you do that, your website’s default login page is deleted, and anyone attempting to log in using that URL would receive a 404 not found page.
You can always download the original file before deleting it as a backup in case something goes wrong later. Simply delete the file in your file manager once you’ve finished doing that.
Again, a 404 error will appear for anyone attempting to access your original login page.
How to Change the WordPress Admin Login URL With a Plugin
After teaching you how to locate the login URL for your WordPress website, we’ll now show you how to modify it. If you’d like, you can change the default URL for your login page to something like example.com/my-private-login-page.
Wait! Why should the login URL be modified? Security is the answer here.
Everyone is aware of how to access the login page of any WordPress website, which is the issue with the default login URL. This gives hackers the opportunity to use brute force attacks to attempt and access your website. The only method to get around this security problem is to use an alternative path for the WordPress login URL.
Using the WPS Hide Login plugin is the simplest approach to modify the login URL. With more than 700,000 installations, it is a well-liked plugin that will assist you in creating a new login URL by concealing the original one. Please make a complete backup of your website before we show you how to use this plugin.
You must first navigate to Plugins > Add New in your admin panel’s left sidebar in order to install the WPS Hide Login plugin. Use the Search Bar on the Add Plugins Page to look for WPS Hide Login.
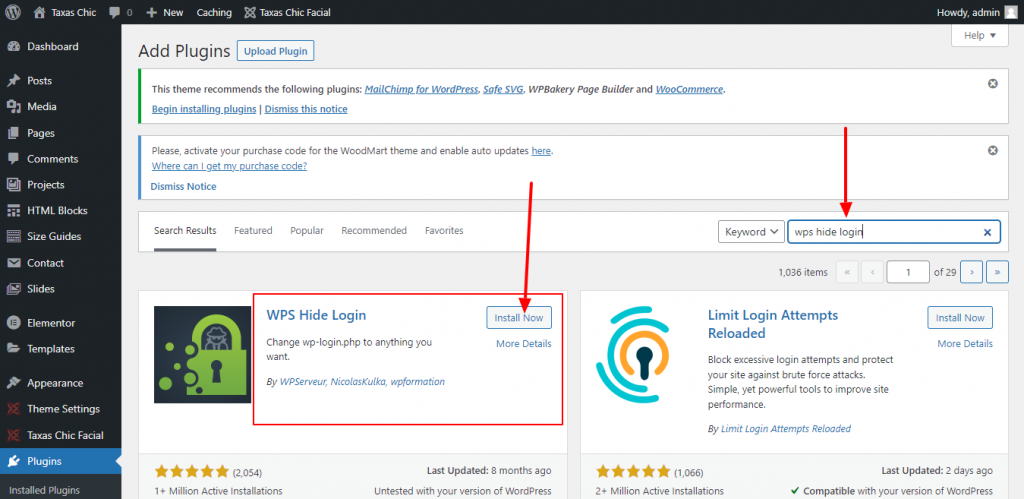
Once you locate the plugin, you ought to install and activate it. To access the General Settings page after activating the plugin, navigate to Settings > General in the sidebar. Scroll down to locate the WPS Hide Login settings on this page.
You should now update the Login URL field with a new pathname (any text you like). In order to prevent losing access to your website, make sure you write down or bookmark the new login URL.
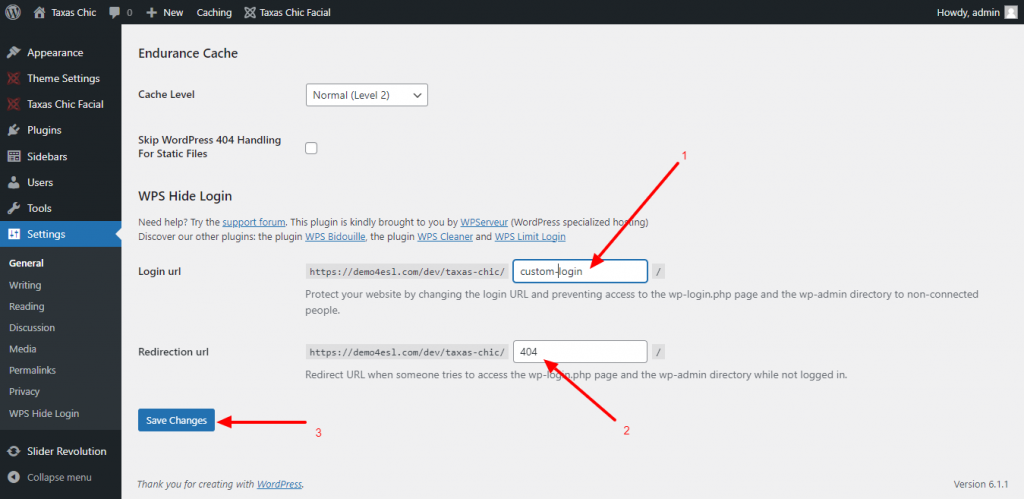
To change the default login URL to a 404 or error page, enter 404 in the Redirection URL field. Once finished, press Save Changes to save the changes.
Now that your new login URL is operational, you can test it.
How to Lock the WordPress Login Page
For security reasons, you should restrict login attempts to your website if you don’t want to change the default login URL. If someone tries to hack your website, you can use this to lock the login page. Utilizing the Limit Login Attempts Reloaded plugin is the most effective technique to restrict login attempts. This plugin can assist you in limiting the number of login attempts and, if necessary, blocking a specific user.
You must navigate to the Plugins > Add New page and then perform a search for the Limit Login Attempts Reloaded plugin there in order to install the plugin. You should install and activate the plugin as soon as you find it.
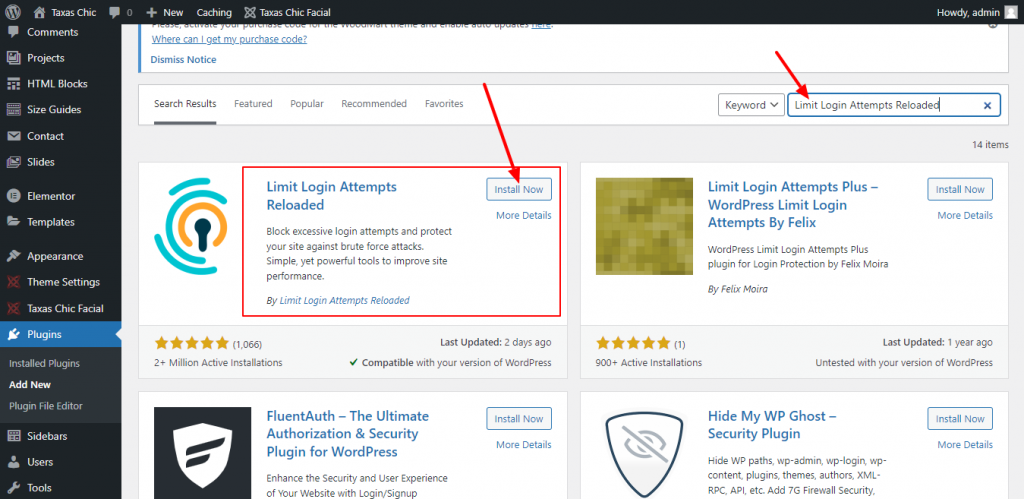
The plugin must then be configured by heading to its options page (Settings > Limit Login Attempts). To make any changes, select the Settings tab on the settings page.
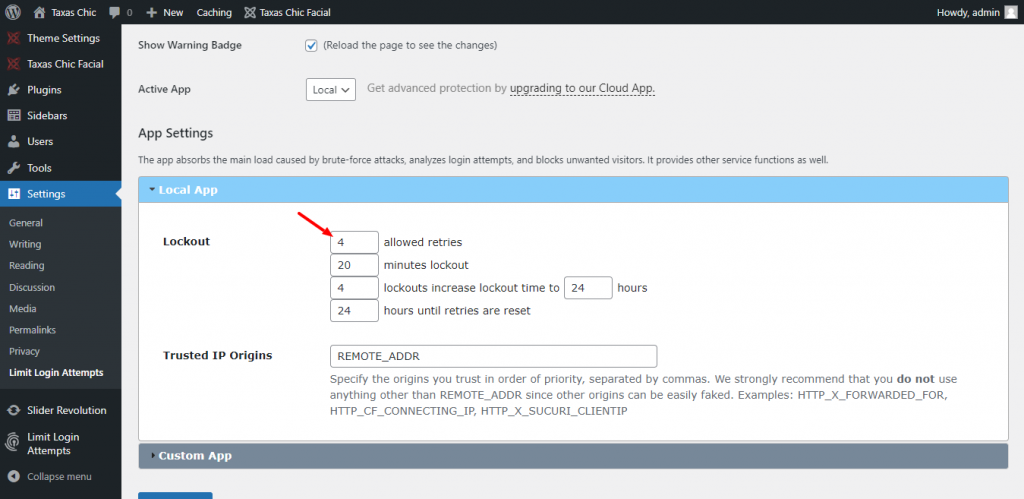
You may modify the maximum number of login attempts here. You can also decide how long after a person has made the maximum number of attempts they should be locked out. When you’ve finished making the necessary adjustments, scroll to the bottom of the page and click Save Settings.
Now let’s test our login page by using the incorrect username and password.
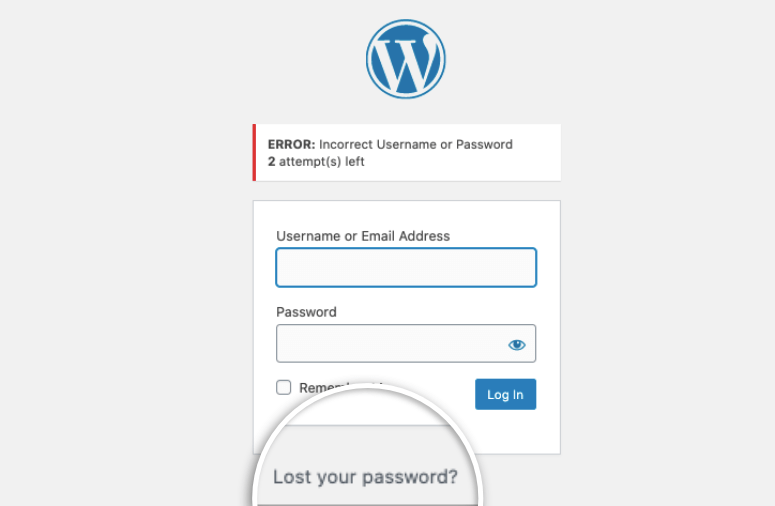
As you can see, the plugin is displaying an error notice and informing you that you still have two chances. You will be locked out for 20 minutes if you attempt to log in incorrectly two more times.
How to Customize the WordPress Admin Login Page
Imagine you’re in charge of a blog with numerous authors, and different users are accessing your WordPress admin login page. In certain circumstances, customizing the login page may be helpful. You won’t need to deal with any code to modify your login page, so don’t worry. For this, you can just utilize the LoginPress(Custom Login Page Customizer) Plugin.
You should first go to the Add Plugins (Plugins>Add New) page and use the search bar to look for LoginPress. When you locate the plugin, add, install, and activate it.
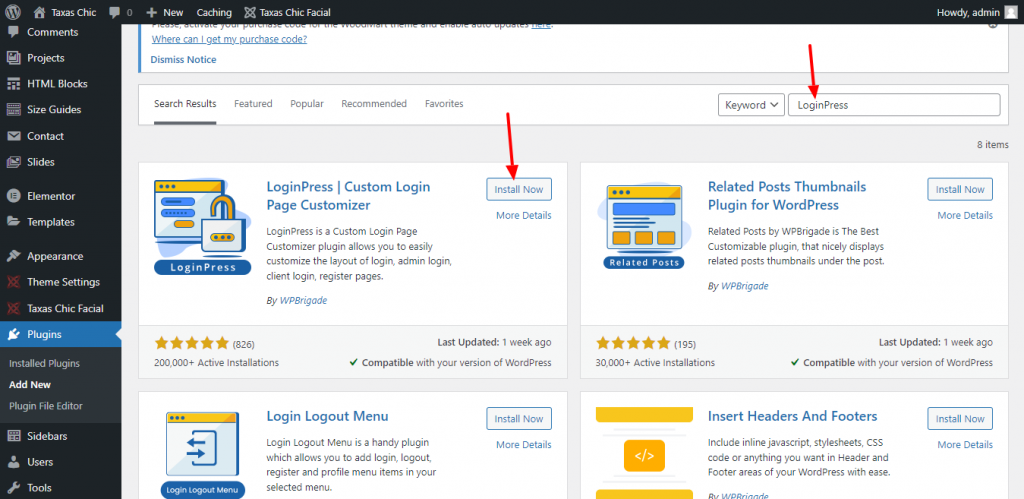
You’ll see a new menu item called LoginPress in the left sidebar after activating the plugin. You should click on LoginPress>Customizer to access the customizer page if you want to alter the login page. Any element can be added or removed in this case.
For instance, by selecting the Backdrop option from the left panel, you can add a background image. After that, you may choose a backdrop color or picture. If you like, you may even include a background video.
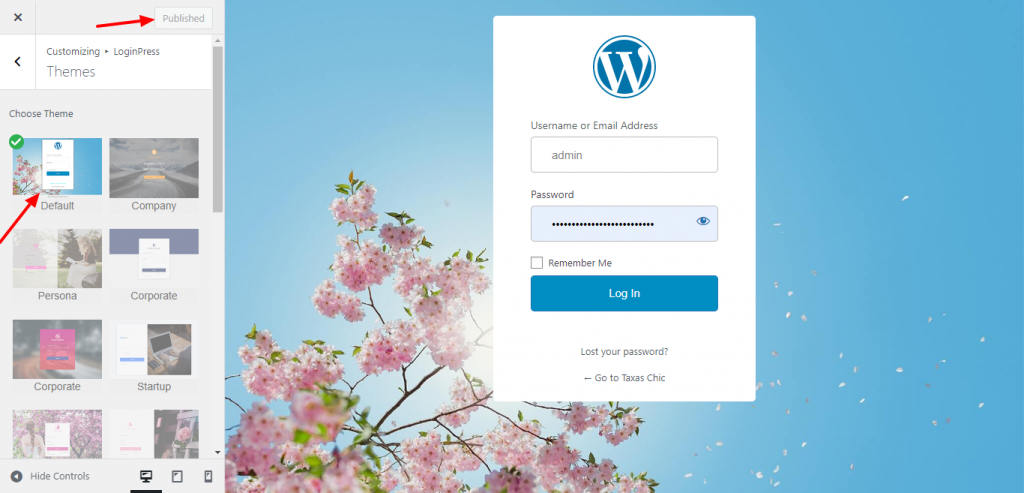
Additionally, you can use the Logo option to swap out the WordPress logo for the logo of your company. If you choose, you can even turn off the logo. You can experiment with the additional features (such as reCAPTCHA, a customizable login form, Button Beauty, and others) and modify the login page to suit your needs.
When finished, click the Publish button in the top-left corner of the page to save your changes.
Common Login Problems on WordPress Websites and How to Fix Them
You could occasionally experience login-related problems on your WordPress website that prohibit you from accessing your WordPress dashboard. Not to worry! The majority of these issues are simple to resolve on your own. Without further ado, let us list a few of the most frequent WordPress login problems and explain how to resolve them.
- Forgot Password
One of the most frequent problems that might prohibit you from accessing your WordPress admin page is losing or forgetting your password.
You must first visit your WordPress login page at example.com/login in order to fix this issue (replace example.com with your domain name). You should use that URL to access the login page if you’ve modified the login URL path.
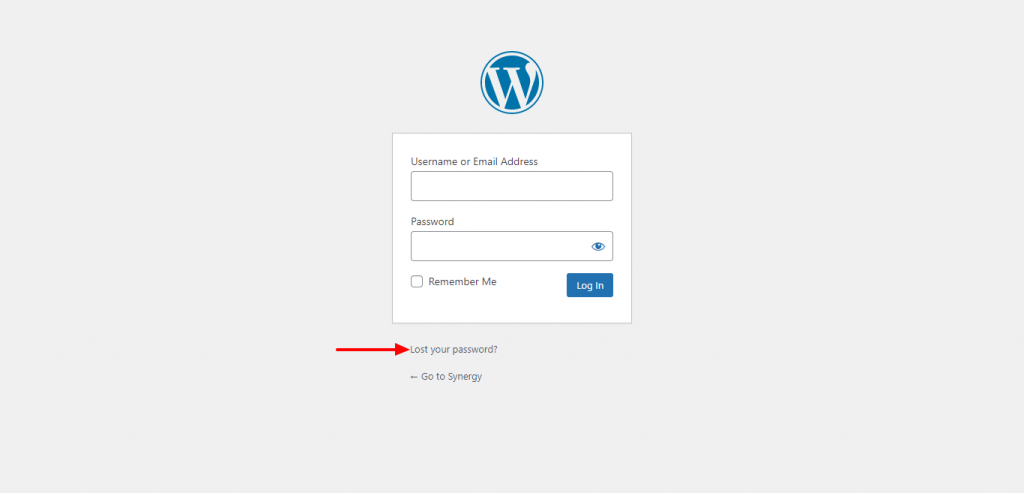
The Lost Your Password link is located underneath the login form. Click it next. You will then be prompted to enter either your login or email address on a new page that will open. When finished, select Get New Password.
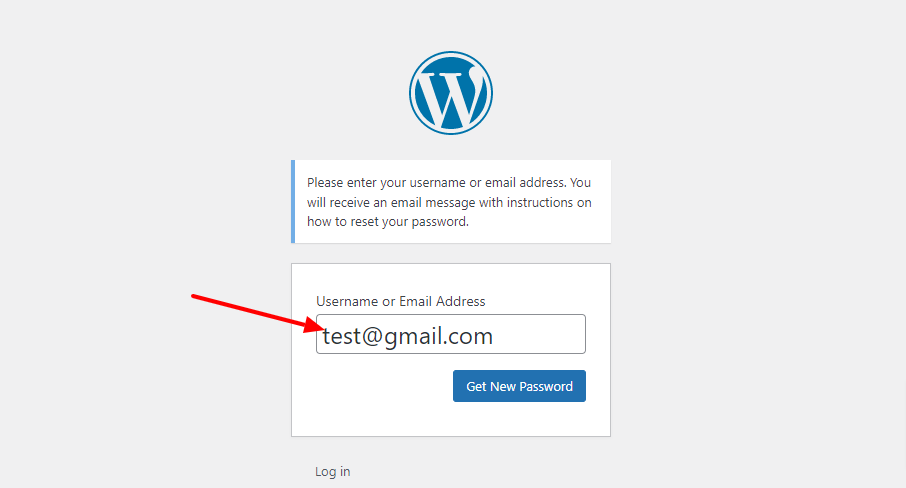
Your email address will now get an email from WordPress that contains a confirmation link. The confirmation link should be clicked in order to change your current password. You’ll be directed to a new page where you’ll be prompted to choose a password. After entering your new password, you ought to select the Reset Password option.
You may now use the new password to access your website’s admin page and log in. You can use the LastPass password manager to store the login information for your website, or you can write down your password elsewhere to prevent this issue from occurring again.
- Forgot Username
What if you can’t remember your WordPress account’s username? On the login screen, there is no option to retrieve (or modify) the username, although there is a password. What then should you do in the situation? In such circumstances, you can, of course, use phpMyAdmin to open the database and locate (or modify) your login. However, you should exercise extreme caution when making any database modifications because they may have an impact on how the website functions.
So, using the UpdraftPlus Plugin, make a backup of your website as soon as possible. Next, access phpMyAdmin by going to your site hosting account. If you’re unsure where to look for the phpMyAdmin option, you can browse the knowledge base for hosting companies or get in touch with their assistance.
You should choose the database for your WordPress installation after phpMyAdmin has opened. The wp users table can be opened by clicking on it in the left sidebar.
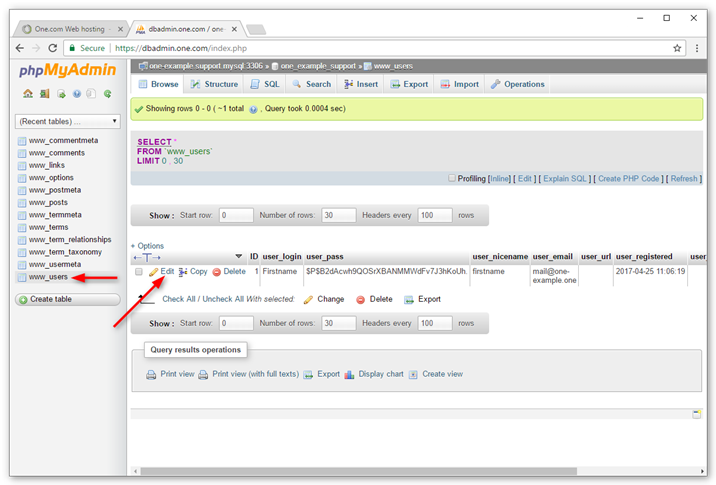
Under user login, you may locate your username here. As you can see, in the example above, my username is Firstname.
Clicking the Edit link will bring you to the edit page where you can change your username.
Here, you can alter the value of the user login to your heart’s content (e.g., XYZ). After finishing, scroll to the bottom of the page and click “Go” to save the modifications.
- Cookies are Blocked
You might occasionally experience a cookie-related error. Your browser does not support or has blocked cookies. To use WordPress, cookies must be enabled. You won’t be able to access your WordPress dashboard as a result. Cookies must be enabled and functioning properly in order for WordPress login to function successfully.
If the problem still appears, you can also erase your browser’s cache.
- Corrupt Login File
The login file may occasionally be corrupt in certain circumstances. In that situation, an error message will appear on the login page. The best solution for this issue is to switch out the corrupt file for a new login file.
To download the most recent version of WordPress to your computer, first, go to the WordPress.org website and click on Get WordPress.
The wp-login.php file should then be copied to your desktop after opening the folder.
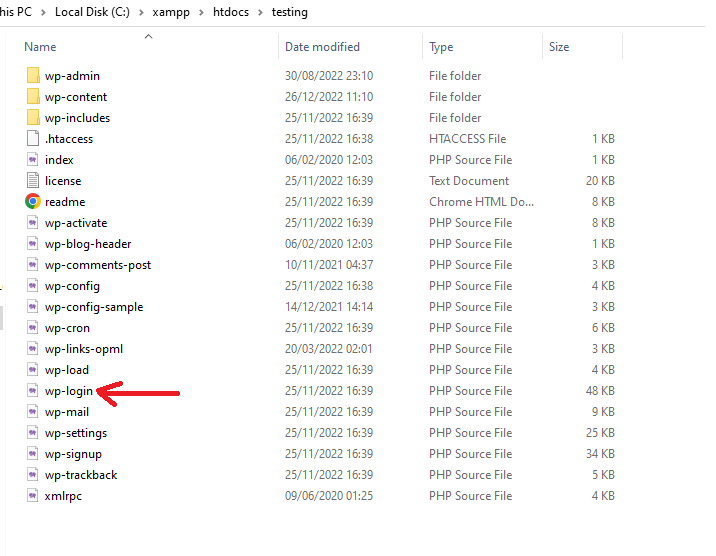
You must now replace the damaged wp-login.php file with this new one. You can accomplish that using FTP or your web host’s File Manager.
You must download and set up the FileZilla Client program on your computer before you can utilize FTP. Open FileZilla next so you may connect to your web hosting server. If you require assistance, get in touch with your web host’s support.
After connecting to your WordPress installation using FTP, you must open the public HTML Folder and remove the wp-login.php file that is already there. To resolve the login issue, you should finally upload the updated wp-login.php file from your desktop.
Conclusion
This tutorial taught us how to locate the WordPress login URL of your website, change it without a plugin, change it with a plugin, lock it, and personalize the WordPress login page.
Due to the fact that it entails altering your core WordPress files, the first technique (without a plugin) should only be used by experienced WordPress users. Because of this, if you don’t know what you’re doing, we advise choosing the second option (without a plugin), which doesn’t entail changing any code.


