How to Set Up Google Search Console and Verify your Site Ownership?
Topics Covered
- A brief history of the Google Search Console
- Why Google Search Console is Significant for Your Website?
- How do I verify site ownership in the Google Search Console?
A Brief History of Google Search Console
The Google Console was launched on May 20, 2015, and was later replaced by the Google Webmaster. Google announced the release of a new search console version in January 2018. Google removed the old search console reports in September 2019, and consequently, all the homepages and dashboards in the old search console were removed completely.
Why Google Search Console is Significant for Your Website?
Google Search Console tools are goldmine for marketers, business owners, and SEO specialists to grow organic traffic and strengthen their digital presence. It allows the website owners or webmasters to understand how Google sees their site, which can help them improve their site and get more traffic from Google. These tools help to monitor, maintain, and troubleshoot your site’s search performance and technical SEO health.
- Review how your site performs on Google.
- Discover which pages Google can find and index on your site.
- Submit sitemaps and individual URLs for crawling.
- Identify technical SEO errors.
- Learn how Google crawls, indexes, and discovers your page.
- Fix errors Google finds when crawling your page.
- Submit updated content to the Google index.
How do I verify site ownership in the Google Search Console?
The first and foremost step in using the search console is to verify site ownership. If you want to shine in the realm of SEO, it is absolutely necessary to verify your Google Search Console ownership after creating your website.
Google Search Console acts as a significant tool for website masters to discover site issues, assure accurate indexing of the web pages, get a deeper understanding of search terms that led visitors to the site, and enjoy a plethora of other benefits.
Google will ask you to prove your ownership before allowing you to add your site, view its analytics, or submit its sitemap. Here, we will help you learn how to set up Google Search Console correctly.
How to set up the Google Search Console?
The first thing you need to verify your site ownership is to set up your website with Google Search Console.
- Sign in to Google Search Console with your Google account.
- The first time you sign in, you will see a pop-up asking you to add a property (i.e., your website).
- Click “Add a property” (choose from the property types given below).
- Domain name provider
- HTML Tags
- HTML files
- Google Analytics tracking codes
- Google Tag Manager container snippets
Domain property in Google Search Console
Once you have added a new property, the next step is to choose a property type.
Google Search Console (GSC) primarily accepts two website property types: URL-prefix property and Domain property. It will appear something like this
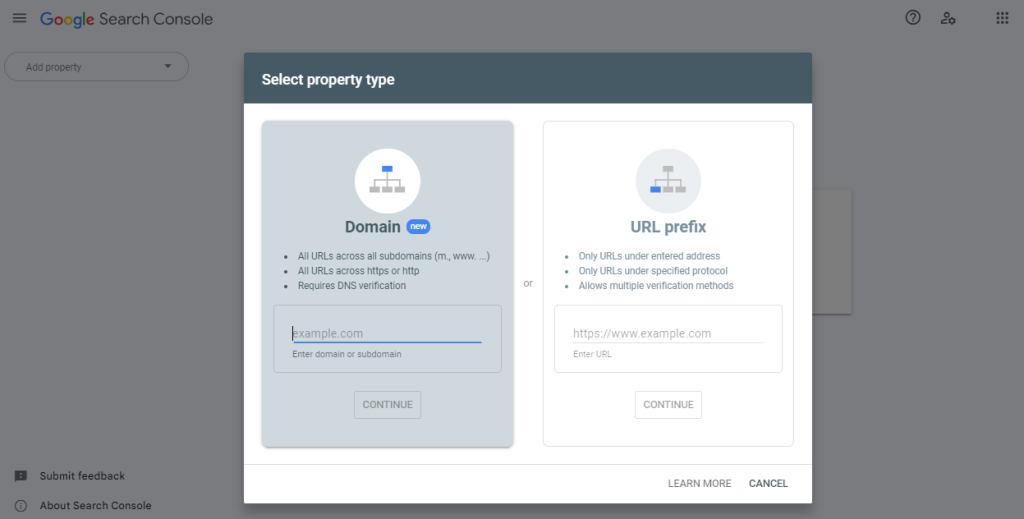
A URL-prefix property covers only the URL you input, while a domain property covers all URLs and subdomains.
A Domain property, like “examplewebsite.com”, would cover:
Subdomains:
blog.examplewebsite.com
shop.examplewebsite.com
support.examplewebsite.com
Protocols (HTTP and HTTPS):
http://examplewebsite.com
https://examplewebsite.com
Different subdirectories or paths:
https://examplewebsite.com/products/
https://examplewebsite.com/blog/
https://examplewebsite.com/contact/
Variations of the main domain:
www.examplewebsite.com
m.examplewebsite.com(for mobile version)
secure.examplewebsite.com
Verification via a Domain Property
DNS verification is a highly recommended method for verifying domain ownership in the Google Console. In this method, you need to add a special DNS.
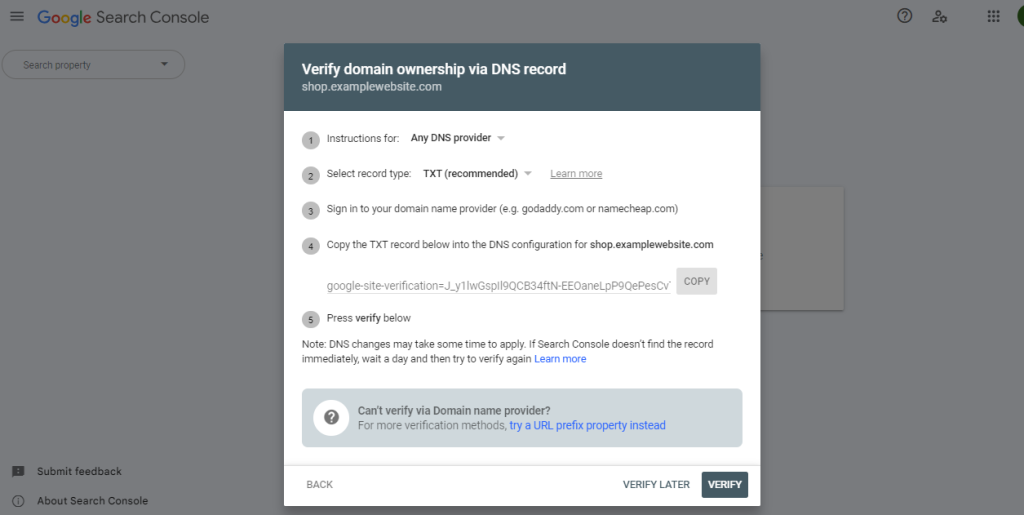
If you use the DNS approach (Domain property type), you can move between WWW and non-WWW in the future without having to re-verify.
The http/https protocol is not present in a domain property URL, and it also ignores www (if you add www.example.com, the property will be created as example.com). It will also cover all subdomains and subparts. For instance, if a domain property is example.com, the data also includes the following subdomains in addition to the domain name:
www.support.m.example.com
www.example.com
Here are steps for setting up Google Search Console using a DNS record
Step 1: Log in to Google Search Console: Go to the Google Search Console website (https://search.google.com/search-console/) and log in with your Google account. If you don’t have an account, you must create a google account to get started.
Step 2: Add property – Once you’re logged in Google Search Console, click on the “+ Add Property” button. Select for the “Domain Option” appearing in the dropdown menu ” option.
Step 3: Enter Your Domain: Next step is to enter your domain in the provided field. Make sure to enter the complete domain, including the “https://” or “http://” part.
Step 4: DNS provider selection – Select your DNS provider from the DNS Providers signing in to your domain name provider (where you purchased the domain) and adding a DNS TXT record or HTML file to your website list for instance, if your DNS provider is example.net, select example.net and click “Start Verification”.
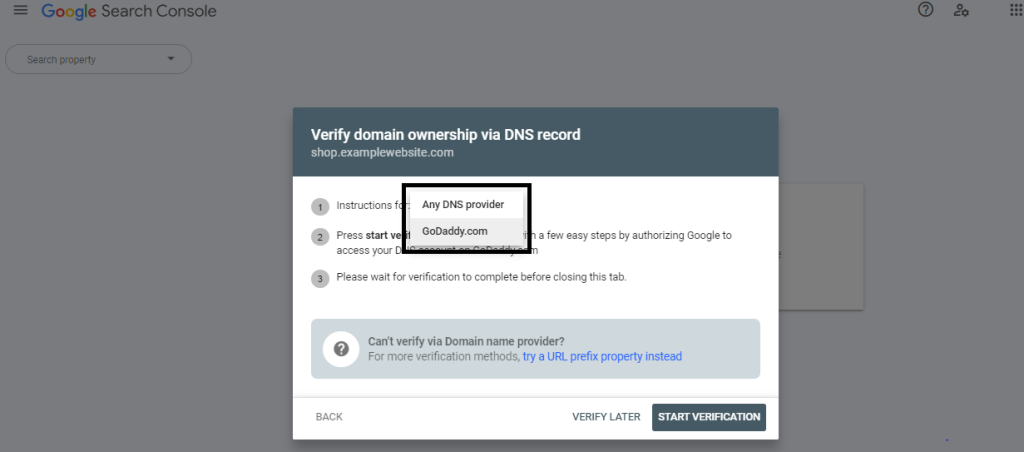
Step 5: Authorization – After adding the DNS TXT record or HTML file to your DNS provider (example.net), you will return to Google Search Console and click the “Verify” button.
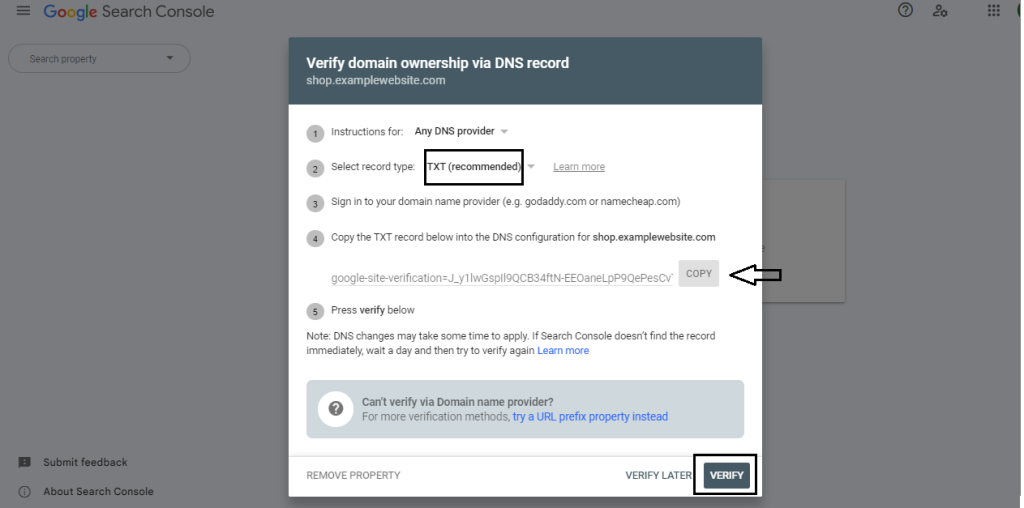
The verification process usually takes some time (up to 72 hours) as the DNS records need to propagate. Once the verification is successful, your domain property will be added to Google Search Console.
Verification Status: Google will display the verification status. Once you are verified, you will gain access to the data and tools for that domain in Google Search Console.
Managing Properties: Manage your verified domain property by clicking on the domain name listed in Google Search Console.
URL-prefix property in Search Console
A URL-prefix property within Google Search Console specifies the beginning of a URL. Any URLs that begin with this prefix are included in that property.
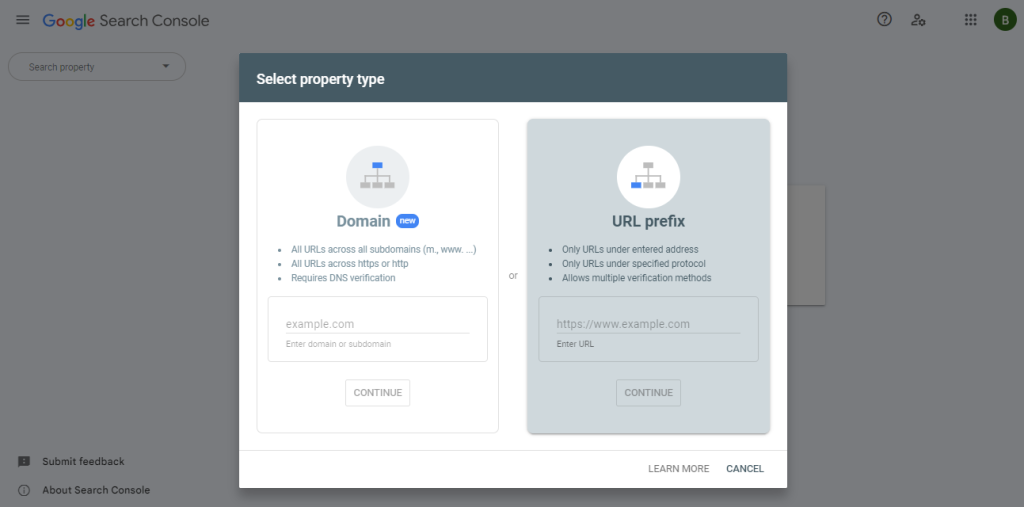
Verification via URL-prefix property in Search Console
Here are the steps for verifying your URL property to confirm ownership of your website:
Step 1: Sign into your Google Search Console account.
Step 2: Select a URL prefix as the property type. Insert your domain in the blank field and click continue.
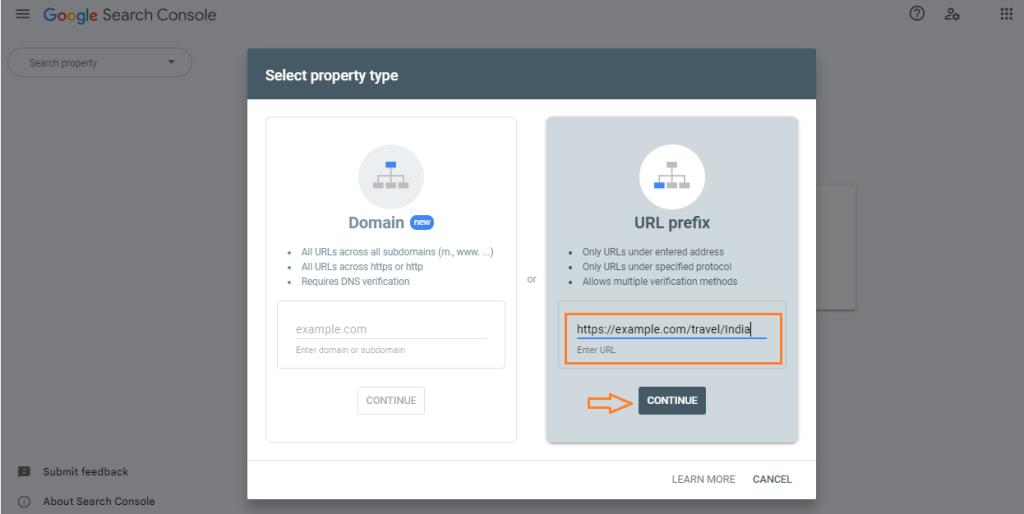
Note: If the WWW prefix is enabled in the general settings, the given URL must contain WWW only.
If your domain is https://example.com/, then the following URLs will fall under your property:
https://example.com/travel/India
https://example.com/India/Agra?a=siamese&b=in-stock
https://example.com/Travel/India/Agra/
However, the following URLs won’t match:
http://example.com/India/ [The specified URL prefix is “https,” not “http.”]
https://m.example.com/Agra/ [Subdomains like “m.example.com” aren’t included in this URL prefix.]
Verification Methods for URL Prefix Property
The URL prefix property supports four types of Google Search Console verification methods, as follows:
- HTML tag
- HTML file upload
- Google Analytics,
- Google Tag Manager
Verification via HTML Tag
As previously mentioned, after selecting a URL prefix property type, the next step is to scroll down and select to verify the property via the HTML tag; this option is usually given under “other verification methods”
Step 1: Copy the provided meta tag. Begin by copying the provided meta tag. Each meta tag is unique and associated with a specific user.

Step 2: Paste the meta tag. Insert the copied meta tag into the <head> section of your website’s homepage. The page should be accessible to users who aren’t logged in.
Place the tag before the </head> closing tag, as illustrated in this example:
<head>
<title>examplesite.com homepage</title>
<meta name=”google-site-verification” content=”paste your meta tag here” />
</head>
Step 3: Verify in the search console: Click on the “Verify” button within the Search Console. Once done, you will receive a notification for successful verification, something like this:

To find the Meta tag, go to the home page of your website and look through the page source text. Make sure the tag is copied and pasted precisely as instructed. Make sure to check the live page to confirm the presence of a meta tag in it. One must also ensure that the meta-tag is positioned within the first 2MB of the HTML file.
GSC will evaluate the presence of the Meta tag on the page. If the Meta Tag is missing or if any other mistake occurs, you will receive a notification with specific information about the error. Additionally, the system will periodically check to see if the tag is still on the page. If it is taken away, you will have to go through the verification procedure again.
Please be aware that only individuals who are authorised to alter the website’s source code are able to add the meta tag. If you don’t have the required permission, you should select a different approach.
HTML file
In order to verify property using HTML file, you need to first upload an HTML file to the root folder of your website. Here is a step to step guide for verification process:

- Download a unique HTML verification file from Google.
- Upload files to the website’s root directory via FTP or cPanel.
- Check for a successful upload by accessing the file’s URL.
- Click “Verify” in the GSCGoogle confirms ownership after a file check.
- Wait for verification’s completion.
- Once verification is completed, you will be able to get access Google Search Console data for properties.
This verification method is quick and simple; however, one of its limitations is that you need to have access to your server, either via FTP or a cPanel File Manager. If you don’t have access to either of them, don’t attempt to verify via this method.
Here are a few considerations for verifying the ownership of property through an HTML file:
Accessibility to non-logged users: Users who are not logged in must be able to access the area where you upload the HTML file. Open the file in a private window to make sure it can be accessed.
Server access for file upload: It is crucial to have access to your server to upload the file, either via FTP or SFTP clients or tools like cPanel File Manager.
Authorization for File Addition: Make sure you have the necessary access and authorization required to add files to the selected location on your server. If you lack the required permission, think about alternative verification options.
Check Hosting Platform Support Pages: Before proceeding, make sure to check the support pages of your website hosting platform. Some platforms might have specific prerequisites for successful verification.
- Permanent File Presence: The file used for ownership verification must remain on your site. You will lose verification if you delete the HTML file and are required to verify again next time.
File Customization: You can add extra lines to the HTML content after the main content, but don’t change the file’s name or make any major modifications to its primary content. It is highly recommended to regularly check to see if ownership is still valid.
Uniqueness for Each User: The HTML file provided for ownership verification is customised for a specific user. You must not share or reuse HTML files intended for another user’s verification.
Google Analytics tracking code
Google Analytics’ tracking code (or ID) is a small snippet of code provided by Google Analytics and inserted into a website’s HTML. It allows Google Analytics to collect data on user behaviour and engagement. Google Analytics uses the tracking code mechanism for compiling the following data:
- Total time spent by a visitor on your site
- The time spent by a visitor on each page and in what order the visitors view web pages
- What internal links are clicked?
- The geographical location of the visitors
- The browser and operating system used

Google Analytics tracking code can be used for property verification only when you have access to both Google Search Console and Google Analytics accounts through the same Google account.
- Ensure you have “edit” rights for the Google Analytics account used by that page.
- The verification code in the current version of Google Analytics 4 is associated with a Google Analytics stream. For earlier versions of Google Analytics, a verification code was connected to a Google Analytics Web Property.
- Home Page accessibility without authorization is mandatory for verification.
- If there are any pages that require authentication, they might not appear frequently in search results, leading to limited search data accrual.
- It is mandatory to use the same Google account for both Search Console and Google Analytics.
- Ensure the Google Analytics code is in the header section of your home page, and it must contain the latest analytics.js or gtag.js snippet.
- The Google Analytics code should remain unmodified for successful verification.
- The tag must be less than 2 MB in size.
- Ensure the presence of the code by opening the page in the web browser, accessing the page source, and searching for the specified snippet.
After all preparatory steps have been completed, verification will be completed in a few simple steps, as follows:
- Step 1: Log in to Search Console with the account you use for Google Analytics.
- Step 2: Click Add Property, enter your website URL, and choose the Google Analytics section.
- Step 3: Select Google Analytics under Other Verification Methods.
- Step 4: Click on Verify.
For verifying site ownership using your Google Analytics tag:
- If you follow all the instructions appropriately, it will be verified immediately.
- If verification fails, refer the potential errorsto troubleshoot the issue.
Google Tag Manager Container Snippet Code
Google Tag Manager makes it easy and quick to add and manage tags on your website. In order to verify properties, the GTM Container snippet code acts as a link between your website and Google’s services.
- Log into your GTM account.
- Click “Create Account” to set up a new container, which holds website tags.
- Complete the process by following the on-screen instructions to set up your container.

Copy and Integrate the Container Snippet:
- After creating a container, you’ll receive a container snippet code. ]This code should be added to website’s HTML.
- Paste the snippet right after the opening <body> tag, ensuring no content is between the <body> tag and the GTM code.
Activate the GTM Container:
- Save and publish your website’s code to activate the GTM container.
Verify in Google Tag Manager:
Return to your GTM account and click your container’s name.
Navigate to the “Tags” section inside the Google Tag Manager interface, where you can manage various tags and scripts for tracking purposes. If the container snippet code is present on your website, it serves as confirmation of successful verification.
Complete Verification in Google Search Console:
- Access the Google Search Console.
- Click “Add Property” and insert your website’s URL.
- Select the Google Tag Manager option for verification.
- Click “Verify” to finalise the process.
If all steps have been executed correctly, the verification process will conclude successfully.
Preparatory Steps for Google Search Console Authentication using the GTM Container Snippet:
Before proceeding with Google Search Console (GSC) authentication using the GTM container snippet, ensure the following:
- You must have Publish or Admin permissions for your container.
- Your website’s homepage must not require authentication.
- Ensure to Log in to Search Console using the same Google account used for Google Tag Manager.
- Ensure that the Tag Manager code is correctly placed immediately after the opening <body> tag on your website’s homepage, with no content in between.
Google Search Console is one of the most robust SEO tools in the industry. If you want to get the most out of the search console, it is recommended to read about the valuable Google Search Console tools for SEO.


